
သင့်ရဲ့ လျှပ်စစ်သုံးကိရိယာ လက်နက်ရုံအတွက် အရေးပါတဲ့ ပြုပြင်ထိန်းသိမ်းရေး လမ်းညွှန်ချက်
သင့် ထောင့်မှုတ်စက် ဘေးကင်းရေးနှင့် စွမ်းဆောင်ရည်အတွက် ထိပ်ဆုံးအခြေအနေတွင် ရှိနေခြင်းသည် အရေးကြီးပါသည်။ ထောင့်ချွန်စက်ပစ္စည်းများတွင် ပျက်စီးမှုလက္ခဏာများ ပေါ်လာပါက ၎င်းတို့ကို မည်သို့အစားထိုးရမည်ကို သိရှိခြင်းဖြင့် ငွေကို ခြွေတာနိုင်ပြီး သင့်ကိရိယာ၏ သက်တမ်းကို ရှည်လျားစေနိုင်ပါသည်။ ပျက်စီးနေသော အစိတ်အပိုင်းများကို မှတ်သားရှာဖွေခြင်း၊ ရွေးချယ်ခြင်းနှင့် အစားထိုးခြင်းတို့၏ အဓိကအဆင့်များကို လမ်းညွှန်ပေးမည့် ဤလမ်းညွှန်ချက်သည် သင့်ထောင့်ချွန်စက်ကို ချောမွေ့စွာ လည်ပတ်နေစေရန် ကူညီပေးမည်ဖြစ်ပါသည်။
စက်တူးစက်၏ အသုံးပြုမှုကို ထိရောက်စွာ ထိန်းသိမ်းရန်အတွက် ထောင့်ကျဉ်းချွတ်စက်၏ အစိတ်အပိုင်းများ အချင်းချင်း ဆက်နွယ်မှုကို နားလည်ခြင်းသည် ပထမဆုံး အဆင့်ဖြစ်ပါသည်။ ချွတ်ခြင်းဒီဇိုင်းမှ ကာဗွန်ဘရပ်ရှ်များအထိ အစိတ်အပိုင်းတစ်ခုစီသည် ကိရိယာ၏ လုပ်ဆောင်မှုတွင် အရေးပါသော အခန်းကဏ္ဍမှ ပါဝင်ပါသည်။ ထောင့်ကျဉ်းချွတ်စက်သည် သင့်၏ သတ္တုပြုလုပ်မှုနှင့် တည်ဆောက်ရေးစီမံကိန်းများအတွက် ယုံကြည်စိတ်ချရသော လုပ်ဖော်ကိုင်ဖက်အဖြစ် ဆက်လက်ရှိနေစေရန် အစိတ်အပိုင်းများ အစားထိုးခြင်း၏ လုပ်ငန်းစဉ်အပြည့်အစုံကို စူးစမ်းလေ့လာကြပါစို့။
သင့်ထောင့်ကျဉ်းချွတ်စက်၏ အစိတ်အပိုင်းစနစ်ကို နားလည်ခြင်း
အရေးကြီးသော အစိတ်အပိုင်းများနှင့် ၎င်းတို့၏ လုပ်ဆောင်ချက်များ
ထောင့်ကျဉ်းချွတ်စက်တိုင်းသည် အတူတကွ ချောမွေ့စွာ အလုပ်လုပ်သည့် အဓိက အစိတ်အပိုင်းများစွာပါဝင်ပါသည်။ မော်တာသည် ကိရိယာ၏ နှလုံးသားအဖြစ် ဆောင်ရွက်ပြီး ဂီယာဘောက်စ်သည် ဤစွမ်းအားကို လည်ပတ်မှုအားအဖြစ် ပြောင်းလဲပေးပါသည်။ စပိန်ဒယ်လော့ခ် စနစ်သည် ဒီဇိုင်းများကို မြန်ဆန်စွာ အစားထိုးနိုင်စေပြီး ချွတ်ခြင်းကာကွယ်မှုသည် လုပ်ငန်းဆောင်တာအတွင်း အရေးကြီးသော ကာကွယ်မှုကို ပေးဆောင်ပါသည်။ ပါဝါခလုတ်၊ ဟန်းဒယ်နှင့် ဟောက်စင်တို့သည် ဤကွဲပြားခြားနားသော ကိရိယာ၏ အခြေခံဖွဲ့စည်းပုံကို ပြီးပြည့်စုံစေပါသည်။
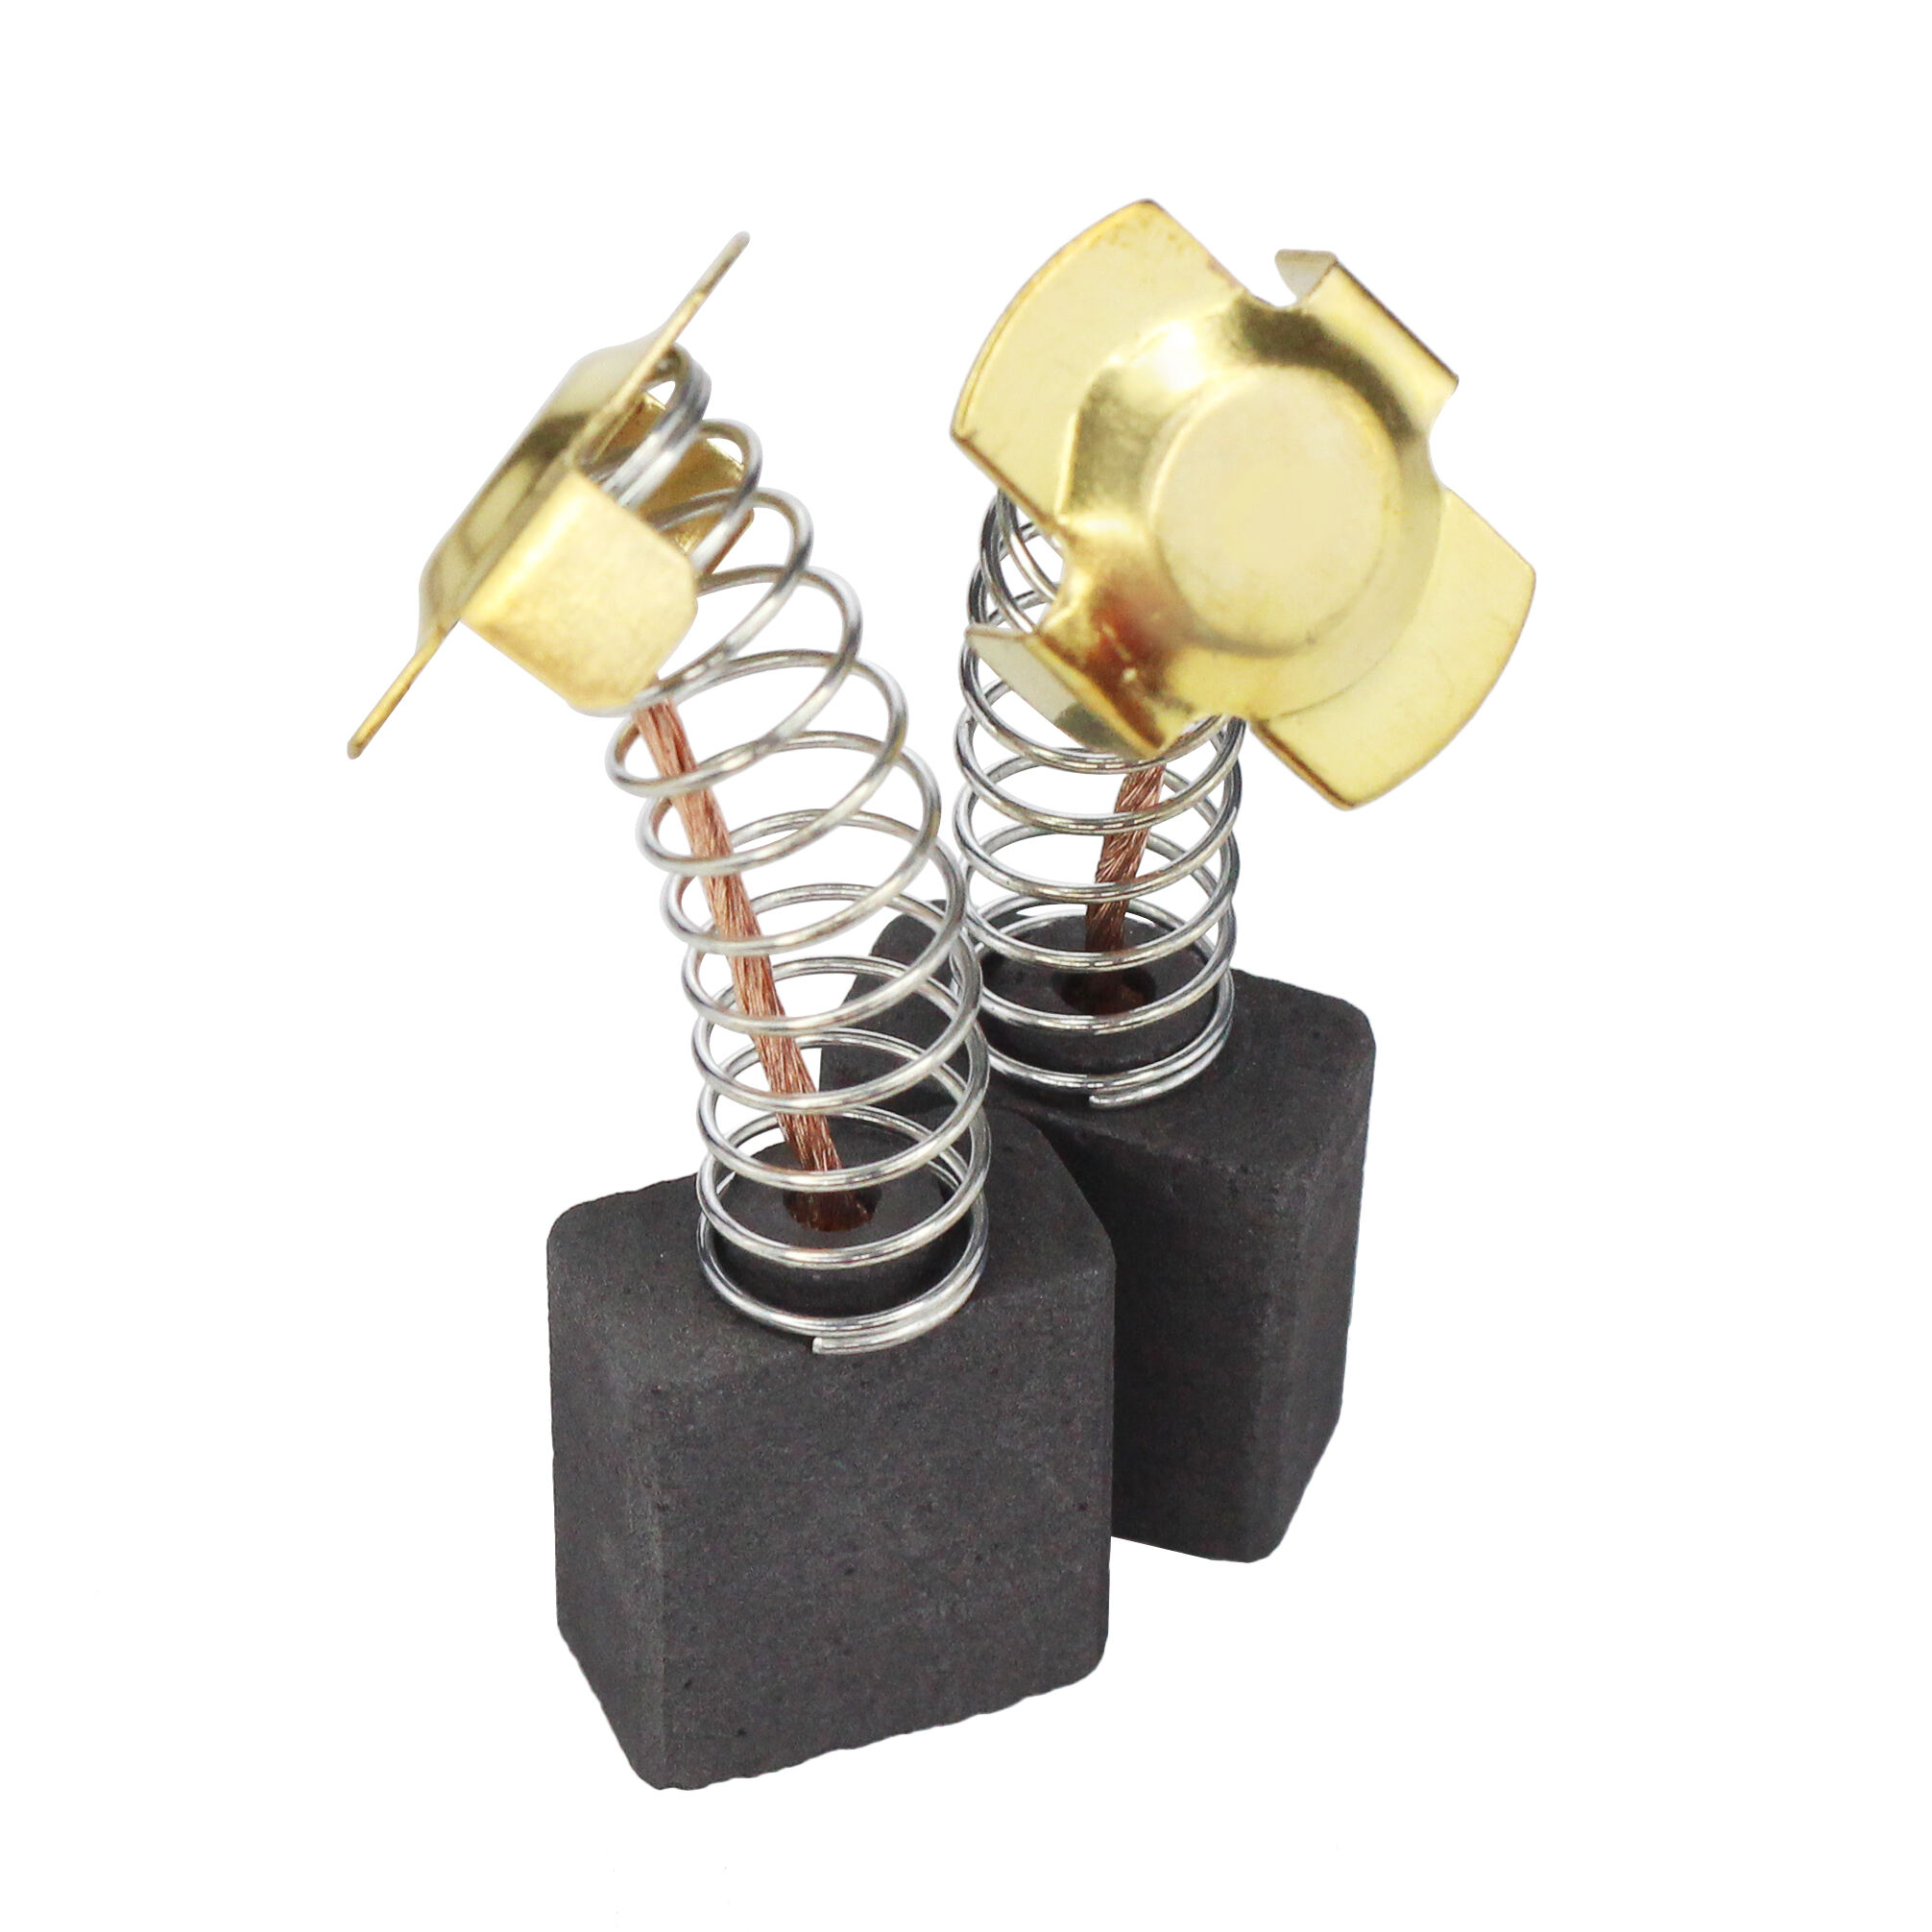
ကာဗွန်ဘရပ်ရှ်များသည် မော်တာ၏ အာမေချာတွင် လျှပ်စစ်ဓာတ်အား ပို့ဆောင်ပေးပြီး၊ ဘီယာများက ရွေ့လျားနေသော အစိတ်အပိုင်းများ၏ ချောမွေ့သော လည်ပတ်မှုကို သေချာစေသည်။ အာဘာ နတ်နှင့် ဖလေ့န်ဂ်တို့သည် ဂရိုင်းဒင်းဒစ်များကို နေရာတွင် တားဆီးထားပေးပြီး၊ လျှပ်စစ်အစိတ်အပိုင်းများက လျှပ်စစ်ဓာတ်အား ဖြန့်ဖြူးမှုနှင့် အမြန်နှုန်းထိန်းချုပ်မှုကို စီမံပေးသည်။ ဤအပြန်အလှန် အပြုအမူများကို နားလည်ခြင်းသည် ပြဿနာများကို ရှာဖွေဖြေရှင်းရာတွင် နှင့် တိကျသော အစားထိုးမှုများ ပြုလုပ်ရာတွင် ကူညီပေးသည်။
အသုံးများလာမှုနှင့် အစားထိုးရန်လိုအပ်မှုများကို ညွှန်ပြသော သက်ဆိုင်ရာလက္ခဏာများ
အန်ဂယ်ဂရိုင်းဒါ၏ အစိတ်အပိုင်းများကို အစားထိုးရန် လိုအပ်သည့်အချိန်ကို သိရှိခြင်းသည် ကိရိယာ၏ ထိရောက်မှုနှင့် ဘေးကင်းလုံခြုံမှုကို ထိန်းသိမ်းရန် အရေးကြီးပါသည်။ မှုတ်သံများ၊ အလွန်အမင်း တုန်ခါမှုများ သို့မဟုတ် စွမ်းအင်ထုတ်လုပ်မှု ကျဆင်းလာခြင်းများသည် အသုံးပြုပြီး ဘီယာများ သို့မဟုတ် ကာဗွန်ဘရပ်ရှ်များကို ညွှန်ပြနိုင်သည်။ ဂရိုင်းဒင်းဂါ့ဒ်တွင် မြင်သာသော ပျက်စီးမှု၊ လက်ကိုင်များ ပြေလျော့နေခြင်း သို့မဟုတ် လျှပ်စစ်ကြိုးများ ပြဲနေခြင်းတို့ကို ချက်ချင်း ဂရုစိုက်ရန် လိုအပ်ပါသည်။ ဤအစိတ်အပိုင်းများကို ပုံမှန်စစ်ဆေးခြင်းဖြင့် မမျှော်လင့်ဘဲ ပျက်စီးမှုများနှင့် ဖြစ်နိုင်ခြေရှိသော ဘေးအန္တရာယ်များကို ကာကွယ်နိုင်ပါသည်။
မောင်းနှင်မှုပြောင်းလဲခြင်းများ၊ ဥပမာ အရှိန်မတည်ငြိမ်ခြင်း သို့မဟုတ် စတင်အသုံးပြုရန် ခက်ခဲခြင်းတို့သည် ပုံမှန်အားဖြင့် အတွင်းပိုင်းကိရိယာများ ဆုံးရှုံးနေခြင်းကို ညွှန်ပြပါသည်။ ဖလေးနှင့် အာဘား အဆို့ရှင်တို့ကို ပါဝင်သော ကြိတ်ခွဲဒီဇိုး တပ်ဆင်မှုစနစ်သည် ဒီဇိုးများကို တုန်ခါမှုများ ပိုမိုများပြားလာခြင်း သို့မဟုတ် ဒီဇိုးများကို ခိုင်မာစွာ တပ်ဆင်ရန် ခက်ခဲလာခြင်းတို့ဖြင့် ဆုံးရှုံးနေသည့် လက္ခဏာများကို ပြသနိုင်ပါသည်။ ထိုကဲ့သို့သော လက္ခဏာများကို ဘယ်သောအခါမျှ လျစ်လျူရှုမထားသင့်ပါ။ အကြောင်းမှာ မကုစားပါက ပိုမိုပြင်းထန်သော ပျက်စီးမှုများကို ဖြစ်ပေါ်စေနိုင်သောကြောင့်ဖြစ်ပါသည်။
အဆင့်ဆင့် အစားထိုးမှု လုပ်ငန်းစဉ်များ
သင့်အလုပ်နေရာနှင့် ကိရိယာများကို ပြင်ဆင်ခြင်း
ထောင့်ကြိတ်စက်၏ အစိတ်အပိုင်းများကို အစားထိုးရန် စတင်မည့်အခါတိုင်အောင် သန့်ရှင်းပြီး အလင်းရောင်ကောင်းမွန်သော အလုပ်နေရာတစ်ခုကို ဖန်တီးပါ။ သင့်ကြိတ်စက်ထုတ်လုပ်သူမှ အကြံပြုထားသော ပလပ်ဝါးများ၊ ဝရင်ခက်များနှင့် အထူးကိရိယာများအပါအဝင် လိုအပ်သော ကိရိယာများကို စုဆောင်းပါ။ လုပ်ဆောင်မှုနှင့် ဘေးကင်းလုံခြုံမှုအတွက် အရေးကြီးသောကြောင့် သင့်စက်၏ မော်ဒယ်နှင့် ကိုက်ညီမှုရှိသော အစားထိုးအစိတ်အပိုင်းများကို သေချာစွာ ရယူထားပါ။
ပြန်လည်တပ်ဆင်ချိန်တွင် အထောက်အကူဖြစ်စေရန် ဖြုတ်ချိတ်စဉ် ဓာတ်ပုံများ သို့မဟုတ် မှတ်စုများ ရိုက်ယူပါ။ အသေးစားအစိတ်အပိုင်းများ ဆုံးရှုံးခြင်း သို့မဟုတ် ရောထွေးခြင်းမှ ကာကွယ်ရန် သီးခြားပုံးများတွင် စနစ်တကျ စီထားပါ။ အသုံးပြုသူလက်စွဲကို အနီးတွင် ထားရှိခြင်းဖြင့် အစိတ်အပိုင်းများအတွက် အပိုအကြံပြုချက်များနှင့် တိကျသော တိုက်ရိုက်တန်ဖိုးများကို ရရှိနိုင်ပါသည်။
ဘေးကင်းစွာ ဖြုတ်ချိတ်ခြင်းနှင့် တပ်ဆင်ခြင်းနည်းလမ်းများ
စွမ်းအင်အရင်းအမြစ်ကို ဖြုတ်ချပြီး တပ်ဆင်ထားသော ပစ္စည်းများကို ဖယ်ရှားခြင်းဖြင့် စတင်ပါ။ ထောင့်ကိုက်ဂရိုင်ဒါအစိတ်အပိုင်းများကို ကိုင်တွယ်ရာတွင် ဆက်စပ်ပစ္စည်းများကို ပျက်စီးမှုမဖြစ်စေရန် ဖြုတ်ချိတ်ရန် မှန်ကန်သော အစီအစဥ်ကို လိုက်နာပါ။ နေရာပြန်လည်တပ်ဆင်ရာတွင် မှန်ကန်စေရန် နှင့် နေရာပြောင်းလဲမှုကို သတိထားမှတ်သားပါ။
တပ်ဆင်စဉ်တွင် အစိတ်အပိုင်းအားလုံး မှန်ကန်စွာ တပ်ဆင်ပြီး လိုအပ်သည့်နေရာများတွင် လွတ်လပ်စွာ လှုပ်ရှားနိုင်ကြောင်း သေချာပါစေ။ ထုတ်လုပ်သူမှ အကြံပြုထားသော ဆီများကို လိုအပ်သော အစိတ်အပိုင်းများသို့ လူးပါ။ အားလုံးကို သတ်မှတ်ထားသော တိုက်ရိုက်တန်ဖိုးများအတိုင်း တင်းကျပ်ကြောင်း စစ်ဆေးပါ။ မှားယွင်းသော တပ်ဆင်မှုကို ညွှန်ပြနိုင်သည့် မှားယွင်းသော အသံများကို နားထောင်ရန် ကိရိယာ၏ လုပ်ဆောင်မှုကို တဖြည်းဖြည်း စမ်းသပ်ပါ။
လုပ်ငန်းစဉ်အကောင်အထည် အကောင်းဆုံး လုပ်ဆောင်ချက်များ
ကာကွယ်ရေးနှင့် ပုံမှန်စစ်ဆေးခြင်း
ပုံမှန်ထိန်းသိမ်းမှုအစီအစဉ်ကို အကောင်အထည်ဖော်ခြင်းသည် ထောင့်ဂရိန်ဒါ၏ အစိတ်အပိုင်းများ၏ သက်တမ်းကို သိသိသာသာ ရှည်လျားစေပါသည်။ အသုံးပြုပြီးနောက်တိုင်း ကိရိယာကို သန့်ရှင်းရေးပြုလုပ်ပါ၊ အထူးသဖြင့် လေဝင်လေထွက်အပေါက်များနှင့် လှုပ်ရှားနေသော အစိတ်အပိုင်းများကို အထူးဂရုပြုပါ။ ပါဝါကြိုးကို ပျက်စီးမှုရှိမရှိ စစ်ဆေးပါ၊ ပါဝါကြိုးနှင့် ပါဝင်သော ပင်နီများ တင်းမာနေကြောင်း အတည်ပြုပါ။ သတ်မှတ်ထားသော အစိတ်အပိုင်းများကို ပုံမှန်ဆီထည့်ခြင်းဖြင့် အစောပိုင်း ပျက်စီးမှုကို ကာကွယ်ပေးပြီး ချောမွေ့စွာ လည်ပတ်မှုကို သေချာစေပါသည်။
အစိတ်အပိုင်းများကို အချိန်မှန်လဲလှယ်ခြင်း သို့မဟုတ် ပြုပြင်ခြင်းများကို ခြေရာခံရန် ထိန်းသိမ်းမှုမှတ်တမ်းတစ်ခု ထားရှိပါ။ ဤမှတ်တမ်းသည် ပျက်စီးမှုပုံစံများကို ဖော်ထုတ်ရာတွင် အကူအညီဖြစ်စေပြီး နောင်အချိန်တွင် အစိတ်အပိုင်းများ ပြန်လည်လဲလှယ်ရန် လိုအပ်မည့်အချိန်ကို ကြိုတင်ခန့်မှန်းရာတွင် အထောက်အကူဖြစ်စေပါသည်။ ထောင့်ဂရိန်ဒါကို စိုထိုင်းမှုကင်းသော ပတ်ဝန်းကျင်တွင် သိုလှောင်ပါက အတွင်းပိုင်းအစိတ်အပိုင်းများ ချော်ဆီးခြင်းနှင့် ပျက်စီးခြင်းမှ ကာကွယ်ပေးပါသည်။
ပရော်ဖက်ရှင်နယ် ထိန်းသိမ်းမှု အကြံပြုချက်များ
အနက်ရောင် ဂရိုင်ဒါ၏ အစိတ်အပိုင်းအများအား ဝါသနာရှင်များက အစားထိုးနိုင်သော်လည်း ပရော်ဖက်ရှင်နယ်များအား ချန်ထားရန် ပိုကောင်းသော ပြင်ဆင်မှုအချို့ရှိပါသည်။ ရှုပ်ထွေးသော လျှပ်စစ်ပြဿနာများ သို့မဟုတ် အဓိက ဂီယာတပ်ဆင်မှုပြဿနာများတွင် ကျွမ်းကျင်မှုနှင့် အထူးကိရိယာများ လိုအပ်လေ့ရှိပါသည်။ သင့်ကျွမ်းကျင်မှုအဆင့်အား ကျော်လွန်သော အခြေအနေများအတွက် ယုံကြည်စိတ်ချရသော ဝန်ဆောင်မှုဌာနနှင့် ဆက်ဆံရေးတည်ဆောက်ပါ။
အသုံးများသော ကာဗွန်ဘရပ်ရှ်များနှင့် အပိုတိုက်ခွဲဒီဇ်များကို ကြိုတင်ပြင်ဆင်ထားခြင်းဖြင့် အလုပ်မလုပ်နိုင်သောအချိန်ကို အနည်းဆုံးဖြစ်အောင် လုပ်ဆောင်ပါ။ ပုံမှန်အလုပ်လုပ်စဉ်အတွင်း သင့်ကိရိယာမှ ထွက်လာသော အသံများနှင့် တုန်ခါမှုများကို မှတ်မိအောင်လုပ်ပါ။ ဤသိမြင်မှုများက ပြဿနာများ ပိုမိုဆိုးရွားလာမည်မှာ ကြိုတင်သိရှိနိုင်စေပါသည်။
မေးလေ့ရှိသောမေးခွန်းများ
ကျွန်ုပ်၏ အနီးစက်တိုက်စက်တွင် ကာဗွန်ဘရပ်ရှ်များကို မည်မျှခန့်မှန်း၍ အစားထိုးသင့်ပါသနည်း။
အလုပ်လုပ်မှုအခြေအနေနှင့် အရည်အသွေးပေါ်မူတည်၍ ကာဗွန်ဘရပ်ရှ်များကို အသုံးပြုမှု ၅၀ မှ ၁၀၀ နာရီအကြာတွင် အစားထိုးရန် လိုအပ်တတ်ပါသည်။ ဘရပ်ရှ်များ ယိုယွင်းလာပါက စွမ်းအင်ထုတ်လုပ်မှု ကျဆင်းလာခြင်း သို့မဟုတ် အလုပ်လုပ်ပုံ မမှန်ခြင်းများကို သတိပြုပါ။ မျှတသော စွမ်းဆောင်ရည်ရရှိရန် ကာဗွန်ဘရပ်ရှ်များကို အတွဲလိုက် အစားထိုးပါ။
အနီးစက်တိုက်စက်တွင် တုန်ခါမှုအလွန်အမင်းဖြစ်စေသည့် အကြောင်းရင်းများမှာ အဘယ်နည်း။
အလွန်အမင်းတုန်ခါမှုများသည် ပျက်စီးနေသောဘီယာများ၊ ဟန်ချက်မညီသော (သို့) ပျက်စီးနေသောဒစ်ချ် (သို့) မှားယွင်းစွာချိန်ညှိထားသော ထောင့်ကြိတ်စက်အစိတ်အပိုင်းများကြောင့် အဖြစ်များပါသည်။ ပျက်စီးမှုရှိမရှိစစ်ဆေးရန် စပင်ဒယ်နှင့် ဒစ်ချ်တပ်ဆင်မှုစနစ်ကို စစ်ဆေးပြီး အစိတ်အပိုင်းအားလုံးကို သင့်တော်စွာ တင်းကျပ်စေရန် သေချာပါစေ။ နောက်ထပ်ပြဿနာများကို ကာကွယ်ရန် ပျက်စီးနေသောအစိတ်အပိုင်းများကို ချက်ချင်းအစားထိုးပါ။
တစ်ခုလုံးကို အစားထိုးသင့်သည့်အချိန်ကို ဘယ်အချိန်မှာ စဉ်းစားသင့်ပါသလဲ။
ပြင်ဆင်မှုကုန်ကျစရိတ်သည် ကိရိယာအသစ်တစ်ခု၏ ဈေးနှုန်း၏ ၅၀% ကျော်လွန်နေသည့်အခါ (သို့) အဓိကအစိတ်အပိုင်းများစွာ တစ်ပြိုင်နက်တည်း ပျက်စီးသွားသည့်အခါတို့တွင် အစားထိုးသင့်ပါသည်။ အသက်၊ အစိတ်အပိုင်းအစားထိုးနိုင်မှုရှိမရှိနှင့် ပြင်ဆင်မှုများ၏ ကြိမ်နှုန်းတို့ကို ဤဆုံးဖြတ်ချက်တွင် ထည့်သွင်းစဉ်းစားသင့်ပါသည်။ တစ်ခါတစ်ရံတွင် ပိုမိုကောင်းမွန်သော လုပ်ဆောင်ချက်များနှင့် ဘေးအန္တရာယ်ကင်းရှင်းရေးစနစ်များပါသော မော်ဒယ်အသစ်သို့ အဆင့်မြှင့်တင်ခြင်းသည် ရေရှည်တွင် ပိုမိုစီးပွားဖြစ်မက်ခြင်းဖြစ်ပါသည်။