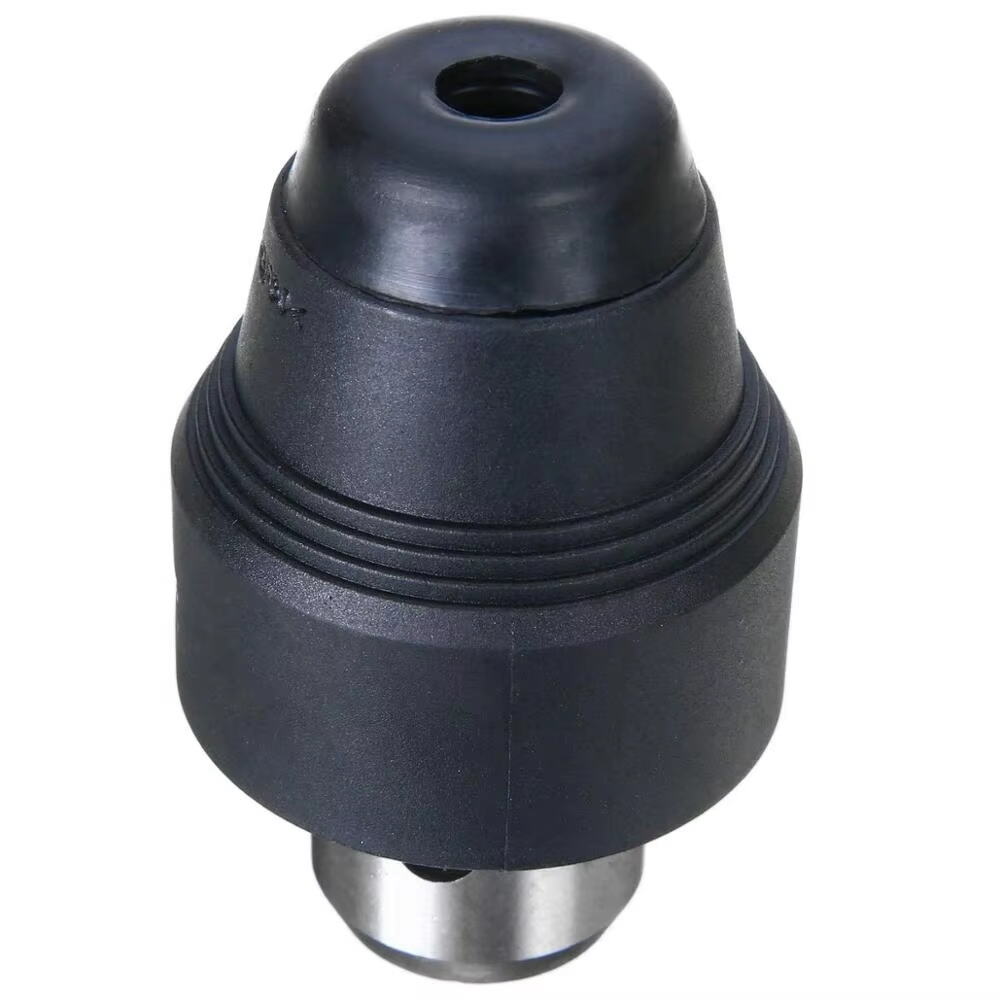
Դրիլ չափագրության ադապտատորների կարևորությունը և վorteնեցումը: Հասկացողություն և հատուկ առումով
Ինչ է կողավոր չափագրի հաստատունը?
Բուրգի փոխարկիչները կյանքը հեշտացնում են էլեկտրական գործիքներով աշխատելիս, քանի որ թույլ են տալիս բուրգերին աշխատել տարբեր տեսակի բիթերով: Ըստ էության, դրանք միացնում են բուրգի փողը ցանկացած բիթին, որը մարդը այդ պահին կարիք ունի, այնպես որ մեկ տեսակից մյուսին անցումը հարթ է լինում առանց մեծ դժվարացումների: Շուկան առաջարկում է այդ փոխարկիչների երեք հիմնական տեսակ՝ առանց բանալի փոխարկիչներ, որոնք ցանկացած մեկը կարող է արագ փոխել լրացուցիչ գործիքների կարիք չունենալով, բանալի ունեցող տարբերակներ, որոնք կարիք ունեն հատուկ գործիքի, սակայն ավելի լավ են ամրացվում դժվար աշխատանքների ընթացքում, և այնուհետև կան SDS փոխարկիչներ, որոնք նախատեսված են հատկապես կառուցարարական աշխատանքներում օգտագործվող խոշոր արտադրամամբ հարվածային բուրգերի համար: Այս փոքրիկ սարքերը իսկապես կարևոր են, քանի որ նշանակում է, որ աշխատանքայինները ստիպված չեն լինի գնել մի քանի մասնագիտացված բուրգեր տարբեր նյութեր կամ խորանների չափեր կեղծելու համար: Փոխարենը, որակյալ փոխարկիչների առկայությունը ընդլայնում է ցանկացած բուրգով կատարվող աշխատանքների շրջանակները, ինչը տնային կամ աշխատանքային վայրերում նախագծերի համար և՛ ժամանակ է խնայում, և՛ գումար:
Կարևոր կիրառությունները դրիլի հնարավորությունների ընդլայնման համար
Բացիչ պարանոցի ադապտերները իսկապես հնարավորություն են տալիս ըմբռնել, թե ինչ կարող է հնարավոր լինել փորման գործում, արդյոք մեկը աշխատում է արդյունաբերական նախագծի վրա, թե պարզապես ինչ-որ բան վերանորոգում տանը: Գործարանների հարկերում և շինարարական հրապարակներում այս փոքրիկ սարքերը թույլ են տալիս աշխատողներին փոխանցվել մասնագիտացված բիթերին, որոնք անհրաժեշտ են մետաղի կամ բետոնի պես դժվարին նյութերի հետ աշխատելու համար: Նրանց համար, ովքեր կատարում են տնտեսություն վերանորոգումներ, տարբեր բիթերի հնարավորություններին հասանելիությունը մեծ տարբերություն է առաջացնում, երբ հավաքում են IKEA կահույքը կամ տեղադրում են լոգասենյակի կաբինետները: Ուսումնասիրությունները ցույց են տվել, որ այն մարդիկ, ովքեր հաճախ օգտագործում են ադապտերներ, ավելի արագ են ավարտում աշխատանքները՝ քանի որ փոքր ժամանակ են ծախսում գործիքների փոփոխությունների վրա: Արդյունաբերության մեջ գտնվող մասնագետները նշում են, որ միանգամից ադապտերներ օգտագործելու դեպքում մասնագետները տեսնում են աշխատանքների ավարտման արագության մոտ 30 տոկոսային թռիչք: Այդպիսի ժամանակի խնայողությունը կարևոր է մեծ արտադրական գործարաններից սկսած և ավարտած շաբաթօրյա մարտիկներով, ովքեր զբաղվում են իրենց վերջին DIY արկածներով:
ADVANTAGES OF USING A QUALITY ADAPTER
Լավ արդյունաբերական ամրակների մի լավ մատիտ ձեռք բերելը խանութում աշխատանքներ կատարելիս մեծ տարբերություն է անում: Մեկ այլ մեծ առավելություն այն է, որ կարողանում եք օգտագործել տարբեր տիպի բիթեր առանց ամեն մի աշխատանքի համար հատուկ գործիքների կարիք ունենալու: Սա նվազեցնում է ավելորդ սարքերի թիվը, որոնք կախված են աշխատանքային սեղանից, և աշխատանքային նիստերի ընթացքում ամեն ինչ կարգավոր է պահում: Որակյալ ադապտերները նաև նպաստում են բիթերի անջատվելուց խուսափելուն աշխատանքի ընթացքում, ինչը ակնհայտորեն ամբողջ գործը ավելի անվտանգ է դարձնում այն մարդու համար, ով օգտագործում է արդյունաբերական ամրակը: Ամուր հարմարեցումը կայունություն է ստեղծում, այնպես որ նյութերի միջով փորելիս ավելի քիչ հնարավորություն է ստեղծվում ինչ-որ բան սխալ լինելու: Եվ մի մոռանանք նաև տևականությունը: Լավ ադապտերը պաշտպանում է ինչպես արդյունաբերական ամրակները, այնպես էլ հիմնական միավորը ավելորդ վնասվածքներից, ինչը նշանակում է, որ այդ թանկարժեք գործիքները ավելի երկար են տևում, քան փոխարինման կարիք է առաջանում: Այդ տեսակի տևականությունը իրոք էլ մեծ խնայումներ է բերում երկար ժամանակ հետո:
Հիմնական գործիքներ և նյութեր տեղադրման համար
Պահանջվող գործիքներ՝ կոչում, կանացի և անվտանգության ապահովում
Ճիշտ իրերի պատրաստվելը մեծ տարբերություն է անում ամբարձիչ տեղադրելիս: Ինչ ենք իրոք անհրաժեշտ ունենալ? Ակնհայտորեն լավ որակի ամբարձիչ, մի քանի բանալիներ անհրաժեշտ կարգավորումներ կատարելու համար, ինչպես նաև հիմնարար անվտանգության միջոցներ, օրինակ՝ ձեռնոցներ և աչքերի պաշտպանություն: Այս հիմնարար իրերը օգնում են ամեն ինչ ճիշտ կատարել և մատներն ու աչքերը պաշտպանել ցանկացած վատ իրադրությունից: Գործիքների որակը չափազանց կարևոր է, որպեսզի այն անտեսվի: Բրենդերը, ինչպիսին են Makita-ն և Milwaukee-ն առանձնանում են, քանի որ դրանք արտադրում են ավելի երկար ժամանակ ծառայող և ճնշման տակ ավելի լավ աշխատող իրեր: Այն մարդիկ, ովքեր ներդրում են լավ գործիքների մեջ, սովորաբար ավելի անվտանգ են զգում աշխատանքի ընթացքում, քանի որ ավելի էժան տարբերակները հաճախ կարող են կեղծվել կամ անսպասելի պահերին վնասվել:
Ձեր դրիլի մոդելի համար ճիշտ ադապտատիվի ընտրություն
Ճիշտ պտուտակի փոխարկիչը ընտրելը այնպիսի բան չէ, որ կարելի է անել մտածելուց հետո, առանց հաշվի առնելու, թե ինչն է ավելի լավ աշխատում ձեր կարգավորումների համար: Նախ և առաջ, այն պետք է համատեղելի լինի ձեր կողմից օգտագործվող պտուտակի և այն բիթերի հետ, որոնք մտադիր եք օգտագործել: Փոխարկիչների չափերը տարբեր մոդելների համար մեծապես տարբերվում են, այնպես որ չափումները ստուգելը շատ կարևոր է: Նաև կարևոր է փոխարկիչի պատրաստման նյութը: Դրական պողպատը ավելի երկար է ծառայում և ավելի լավ է դիմանում կանոնավոր օգտագործման դեպքում, քան ավելի էժան նյութերը: Այսօրվա մեծամասշտաբ արտադրողները իրենց տեխնիկական տվյալներն ու գնման ցուցումները տեղադրում են իրենց կայքերում, ինչը խնայում է ժամանակ այդ հարցերով զբաղվելիս: Բոլոր այդ գործոնները հաշվի առնելը թույլ է տալիս ստանալ իրականում համապատասխան փոխարկիչ, որն ամբողջական պտուտակի գործընթացը դարձնում է ավելի հարթ, իսկ ավելորդ խնդիրներից խորապես խորանալ:
Սաfty ներդրումներից առաջ
Անվտանգությունը ամենակարևորն է, երբ ինչ-որ բան տեղադրելու ես պատրաստվում: Նախքան աշխատանքը սկսելը, ամեն ինչ ճիշտ ստուգեք: Համոզվեք, որ էլեկտրաքարշները իրոք աշխատում են, և ուշադիր նայեք ադապտերներին՝ տարիքից կամ վնասվածքներից առաջացած հնարավոր մաշվածքներ ունեն թե ոչ: Նաև աշխատանքային տարածքը մաքուր պահեք, քանի որ անկարգությունը դժբախտ պատահարներ է հրավիրում: Երբ ամեն ինչ ցրված է, հեշտ է փորձելով մի այլ գործիք վերցնել, բան մի բան փորձել կամ մի կարևոր ինչ-որ բան գետնին գցել: ՕՇԱ-ն մի քանի ամենօրյա խորհուրդներ է տալիս գործիքների հետ անվտանգ վարվելու և աշխատանքային տարածքները կարգի բերելու վերաբերյալ: Նրանց խորհուրդները բարդ չեն, սակայն դրանց հետևելը իսկապես տարբերություն է անում: Կանգնեք այս հիմնարար կանոնների վրա կազմակերպման և անմիջական օգտագործման ընթացքում, և ամեն մեկը, ով ներգրավված է այդ նախագծում, շատ ավելի մեծ հնարավորություն կունենա ամբողջ գործընթացի ընթացքում անվտանգ մնալու:
Դեպի անցումից ադապտորի տեղադրման քայլերի գիրք
Քայլ 1. Համոզվեք, որ անցումը և ադապտորն համատեղելի են
Նախքան ցանկացած ադապտեր ձեռք բերելը, ստուգեք, թե արդյոք այն իրոք աշխատում է ձեր կոնկրետ մոդելի էլեկտրական բուրվորի հետ: Սկսեք նրանից, որ պարզեք ձեր բուրվորի պարանոցի չափը՝ այլ կերպ ասած, չափեք այն բացվածքի չափը, որտեղ տեղադրվում է բիթը: Այս պարամետրը ճիշտ որոշելը նշանակում է, որ ադապտերը ճիշտ կլրացնի բուրվորը՝ առանց անհարմար տատանումների աշխատանքի ընթացքում: Շատ բուրվորների արտադրողներ իրենց տեխնիկական հնարավորությունները նշում են իրենց ձեռնարկներում կամ ինտերնետում, այնպես որ արագ ստուգեք այդտեղ՝ ճիշտ թվեր ստանալու համար և խորապես չենթադրելով: Որոշ մարդիկ անտեսում են այս քայլը և հետո դժվարանում են խնդիրների հետ: Չափերի տարբերությունը շատ տնային վարպետների համար իրական խնդիր է դառնում, հաճախ հանգեցնելով ձանձրացուցիչ իրավիճակների կամ նույնիսկ գործիքների վնասման: Նախօրոք այս թաքնված խնդիրների մասին տեղեկանալը երկար ժամանակ խնայում է ձեզ գլխացավություններից և գումարի կորուստից:
Քայլ 2. Ադապտորի կապում կողավորի չեքին
Շատ կարևոր է ադապտերը ճիշտ ամրացնել, որպեսզի այն չի սահեր աշխատանքի ընթացքում: Շատերը կարծում են, որ ամենալավ տարբերակը ադապտերը ճիշտ դիրքով տեղադրելն է ամրակնքի մեխանիզմը ամրացնելուց առաջ: Այս գործընթացը կախված է նաև այն տեսակի պտուտակիչից, որի հետ է կապված: Առանց բանալու պտուտակները սովորաբար ավելի լավ են բռնում, սակայն երբեմն պետք է հատուկ ուշադրություն դարձնել հիմքին, իսկ ավանդական բանալիով պտուտակները հաճախ ունեն հատուկ խորշեր, որոնք պետք է ճիշտ համընկնեն: Նկարներ դիտելը շատ օգնում է, հատկապես նորագույն մոդելների դեպքում, երբ արտադրողները տարբեր հատկություններ են ներդնում: Որոշ մարդկանց կողմից արդեն փորձված ամբողջական տեսանյութ դիտելը կարող է խնայել ժամեր շարունակ ձանձրույթից: Իհարկե անվտանգությունը միշտ առաջնային է, երբ գործ ունենք էլեկտրական գործիքների հետ:
Քայլ 3. Կայուն ենթարկել և ստաբիլություն տեսական ստորագրել
Շատ կարևոր է ապահովել ադապտերի ճիշտ ամրացումը հանքարկման անվտանգ գործողությունների համար: Շատերը համարում են, որ ամենալավ տարբերակը հանդիսանում է որակյալ բանալի օգտագործելը կամ իրենց մոդելի հետ միասին տրված փակման համակարգի կիրառումը: Համոզվեք, որ բոլոր մասերը լիովին ամուր են ամրացված պարկի տիրույթում, այնուհետև անցեք հաջորդ քայլին: Բիթը միացնելուց հետո կատարեք մի քանի կարճ ստուգում՝ առանց նյութ ամրացնելու, պտտեք հանքարկիչը: Ուշադիր հսկեք (և լսեք) անսովոր շարժումներ կամ անսովոր թրթիռներ առանց բեռնված լինելու վիճակում: Այդ փոքրիկ զգուշացնող նշանները հաճախ ցույց են տալիս ամրացման խնդիրները: Չափազանց կարևոր է այդ նշանները չանտեսել, քանի որ անմիջապես լուծելով ամրացման խնդիրները, կխուսափեք ավելորդ խնդիրներից ապագայում, երբ նյութերը կամայական կերպով կարող են ցատկել դուրս:
Քայլ 4. Եկեք կրկնակի ստուգեք համակարգումը և գործառույթը
Միշտ ստուգեք, թե որտեղ է տեղադրված ադապտերը, նախքան փորման աշխատանքներն սկսելը: Համոզվեք, որ այն ճիշտ տեղում է ամրացված փորիչ պահակում, որպեսզի ամեն ինչ ճիշտ աշխատի և աշխատանքի ընթացքում ոչինչ չկորցվի: Կատարեք նաև մի քանի հիմնարար փորձարկումներ, որպեսզի համոզվեք, որ ամեն ինչ հարթ է աշխատում խոչընդոտների առանց: Որոշ մասնագետներ խորապաշխում են ուշադրություն դարձնել ադապտերի պտտման վրա, քանի որ հաճախ հենց այդ փուլում է հնարավոր նկատել խնդիրներ, որոնք մարդիկ բաց են թողնում վերջնական կարգավորումներ կատարելիս: Այս պարզ ստուգումների համար ժամանակ հատկացնելը նշանակում է, որ փորիչը պատրաստ է լինել աշխատանքի և ավելի անվտանգ է լինել կառավարման համար, ինչը մեծ տարբերություն է առաջացնում միջին տեղադրման և որակի միջև՝ տարբեր նախագծերում:
Լավագույն պարագային ամանակները անտառ և արդյունավետ օգտագործման համար
Համապատասխան բիտի մուտքագրման և դուրսագրման տեխնիկա
Շատ կարևոր է ապահովել փորատի պոմպի ադապտերի ճիշտ աշխատանքը և խորան վնասումներից՝ փորատի պոմպի մեջ և դուրս բերելու ճիշտ գործողությունները: Նոր փորատի պոմպը տեղադրելիս համոզվեք, որ այն ճիշտ է տեղադրված պոմպի մեջ ամրակցումը կատարելուց առաջ: Պտտեք պոմպի բանալին ժամսլաքի ուղղությամբ ամրակցված վիճակի հասնելու համար, սակայն չափից ավելի չսեղմեք: Շատ մարդիկ սխալվում են՝ փորատի պոմպերը անկյունագծորեն մտցնելով, ինչը հաճախ վնասում է ինքը փորատի պոմպը և ադապտերը: Միշտ ստուգեք գործիքի արտադրողի կողմից տրված տեղադրման հրահանգները: Շատ արտադրողներ ներառում են օգտակար խորաներ իրենց ապրանքների անվտանգ օգտագործման վերաբերյալ, որոնք իրականում աշխատում են, երբ հետևում են դրանց: Ժամանակ տանել ձեռնարկները կարդալու համար կարող է թվալ ձանձրալի, սակայն հավատացեք, այն արժե այդ ջանքերին, երբ ձեր սարքերը ավելի երկար են տևում և ավելի լավ են աշխատում՝ առանց անակնկալների նախագծի կեսին:
Տուժի և նյութի սահքի հանգում
Շրջադիր մոմենտի վերահսկումը ապահով և արդյունավետ փորման աշխատանքների հիմնարար պայման է: Երբ գործողությունների ընթացքում կիրառվում է չափից ավելի շատ ուժ, հաճախ հանդիպում են խնդիրներ, ինչպես օրինակ՝ սարքավորումների անջատումը կամ փորիչ գլխիկների կոտրումը, որը վտանգի մատնում է աշխատողներին: Ինչպե՞ս խուսափել դրանից. պետք է ամբողջ գործընթացի ընթացքում պահպանվի հաստատուն բռնում և նախընտրել անտիսույզ փորիչ գլխիկներ, որոնք իրոք կայուն են: Ըստ արդյունաբերական տվյալների՝ անբավարար շրջադիր մոմենտի կիրառումը փորման վթարների առաջատար պատճառներից մեկն է: Եթե կիրառվեն ճիշտ մեթոդներ և օգտագործվեն ճիշտ սարքեր, վնասվածքներ կրելու հնարավորությունը՝ շրջադիր մոմենտի չափից ավելի արտահայտման կամ անվտանգության կորստի պատճառով, կնվազի մեծապես: Անվտանգությունը բարելավվում է՝ համապատասխան բարելավման հետ միասին արդյունքների որակի ամբողջական ցուցանիշներով:
Ընկերություններ դժվար հասնելի մակերևույթների մասին
Այն դեպքերում, երբ նյութերը փխրուն են կամ հասանելիությունը սահմանափակ է, հատուկ մեթոդների կիրառումը շատ կարևոր է, եթե ցանկանում ենք լավ արդյունքների հասնել առանց վնաս հասցնելու: Նվազեցրեք պտուտակի արագությունը և օգտագործեք հատուկ այն պտուտակները, որոնք նախատեսված են թեթև շփումների համար: Անհարմար անկյուններով կամ դժվարացնող մակերեսներով աշխատանքների դեպքում պտուտակի համար ուղղորդություն ապահովող մի ինչ-որ բան ունենալը շատ կարևոր է: Ամենափորձառու աշխատանքայինները միշտ ասում են, որ այս տեսակի իրավիճակներին տիրապետելու համար պետք է ժամանակ ծախսել աշխատանքային սեղանի մոտ: Նրանք հաճախ խորապանծում են սկսել փոքր մասերով, իսկ հետո անցնել իրական նախագծերին: Ավելորդ ջանքերի գովազդը հաճախ վճարվում է լավ տեխնիկայի շնորհիվ, որը կանխում է թանկարժեք սխալերը և պահպանում է աշխատանքի մակերեսի ամբողջականությունը:
Հաճախ տրամադրվող հարցեր
Ո՞ր տեսակի կողմնակապակցի հաստատուններ կարող են օգտագործվել։
Հեղումների չափագրի ադապտորները գոյություն ունեն տարբեր տիպերով, ներառյալ անանգամի և անգամով ադապտորներին։ Անանգամի ադապտորները թույլ են տալիս արագ բիթերի փոխարինում առանց գործիքների, անգամով ադապտորները պահում են ավելի անվանում անվանությունը, իսկ SDS ադապտորները նախատեսված են պտույտային համարների համար՝ թույլատրելով արագ բիթերի փոխարինում։
Ինչպես հեղումների չափագրի ադապտորները ընդլայնում են հեղումների հնարավորությունները?
Դրիլային չեկադապտերը expended drilling capabilities by enabling the use of specialized bits for diverse tasks such as cutting and hole-making in hard materials, thus broadening the range of drilling applications and increasing overall efficiency.
Какие меры безопасности необходимо соблюдать при установке дрели с адаптером?
Մոտեցումների վերաբերյալ ան전ությունը ներառում է դրիլի ֆունկցիոնալության հաստատումը, ադապտերների ստորագրությունը կամ վարունքի համար, կազմակերպված աշխատանքային տարածքը, OSHA ղեկավարման ուղերձների հետևությունը գործիքների համար և ճիշտ աշխատանքային պայմանների պահպանումը անտառ տեղադրման համար:
كيف يجب تنظيف ملقمات الحفر لضمان وظيفتها؟
Для предотвращения накопления пыли и поддержания функциональности должны использоваться сжатый воздух для удаления пыли и смазка движущихся частей. Рекомендуется часто очищать их после использования.
كيف يمكن إصلاح مشاكل الشائعة في ملقمات الحفر؟
Ծածկալի և սխալ համաչափության պարզ խնդիրները կարող են լուծվել чак-ի միջոցով կատարվող կայուն ամրապնումով, чак բանալի օգտագործմամբ լրացուցիչ крутящий մոเมนտ, ադապտորի անընդհատ կալիբրացիան և մաստերների խնդրերը լուծող մաստերական տեխնիկական տիպերի հետևությամբ։
Բովանդակության աղյուսակ
- Դրիլ չափագրության ադապտատորների կարևորությունը և վorteնեցումը: Հասկացողություն և հատուկ առումով
- Հիմնական գործիքներ և նյութեր տեղադրման համար
- Դեպի անցումից ադապտորի տեղադրման քայլերի գիրք
- Լավագույն պարագային ամանակները անտառ և արդյունավետ օգտագործման համար
-
Հաճախ տրամադրվող հարցեր
- Ո՞ր տեսակի կողմնակապակցի հաստատուններ կարող են օգտագործվել։
- Ինչպես հեղումների չափագրի ադապտորները ընդլայնում են հեղումների հնարավորությունները?
- Какие меры безопасности необходимо соблюдать при установке дрели с адаптером?
- كيف يجب تنظيف ملقمات الحفر لضمان وظيفتها؟
- كيف يمكن إصلاح مشاكل الشائعة في ملقمات الحفر؟

